Friday 22 August 2008

Forgotten Stamps - Wonderous Gift

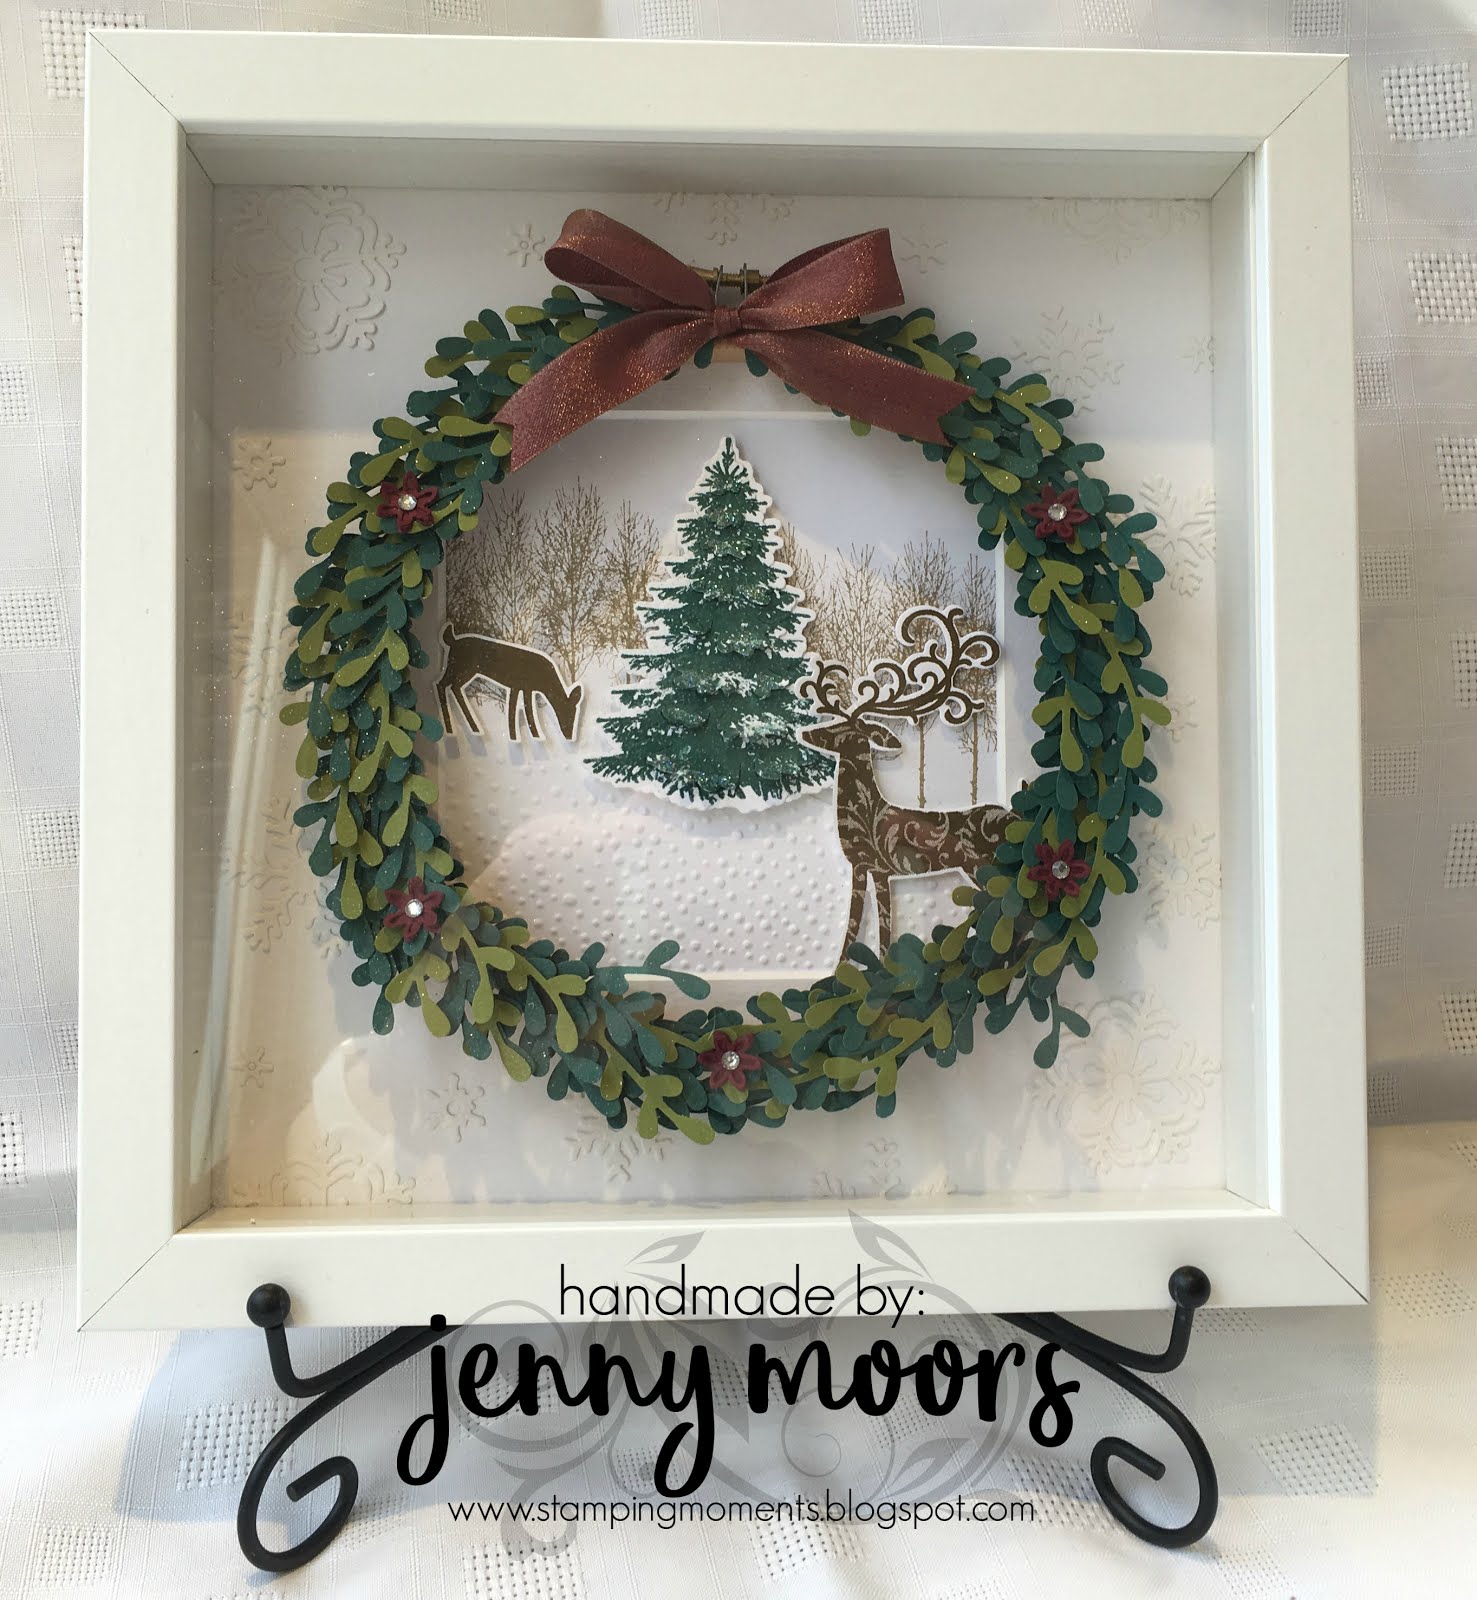
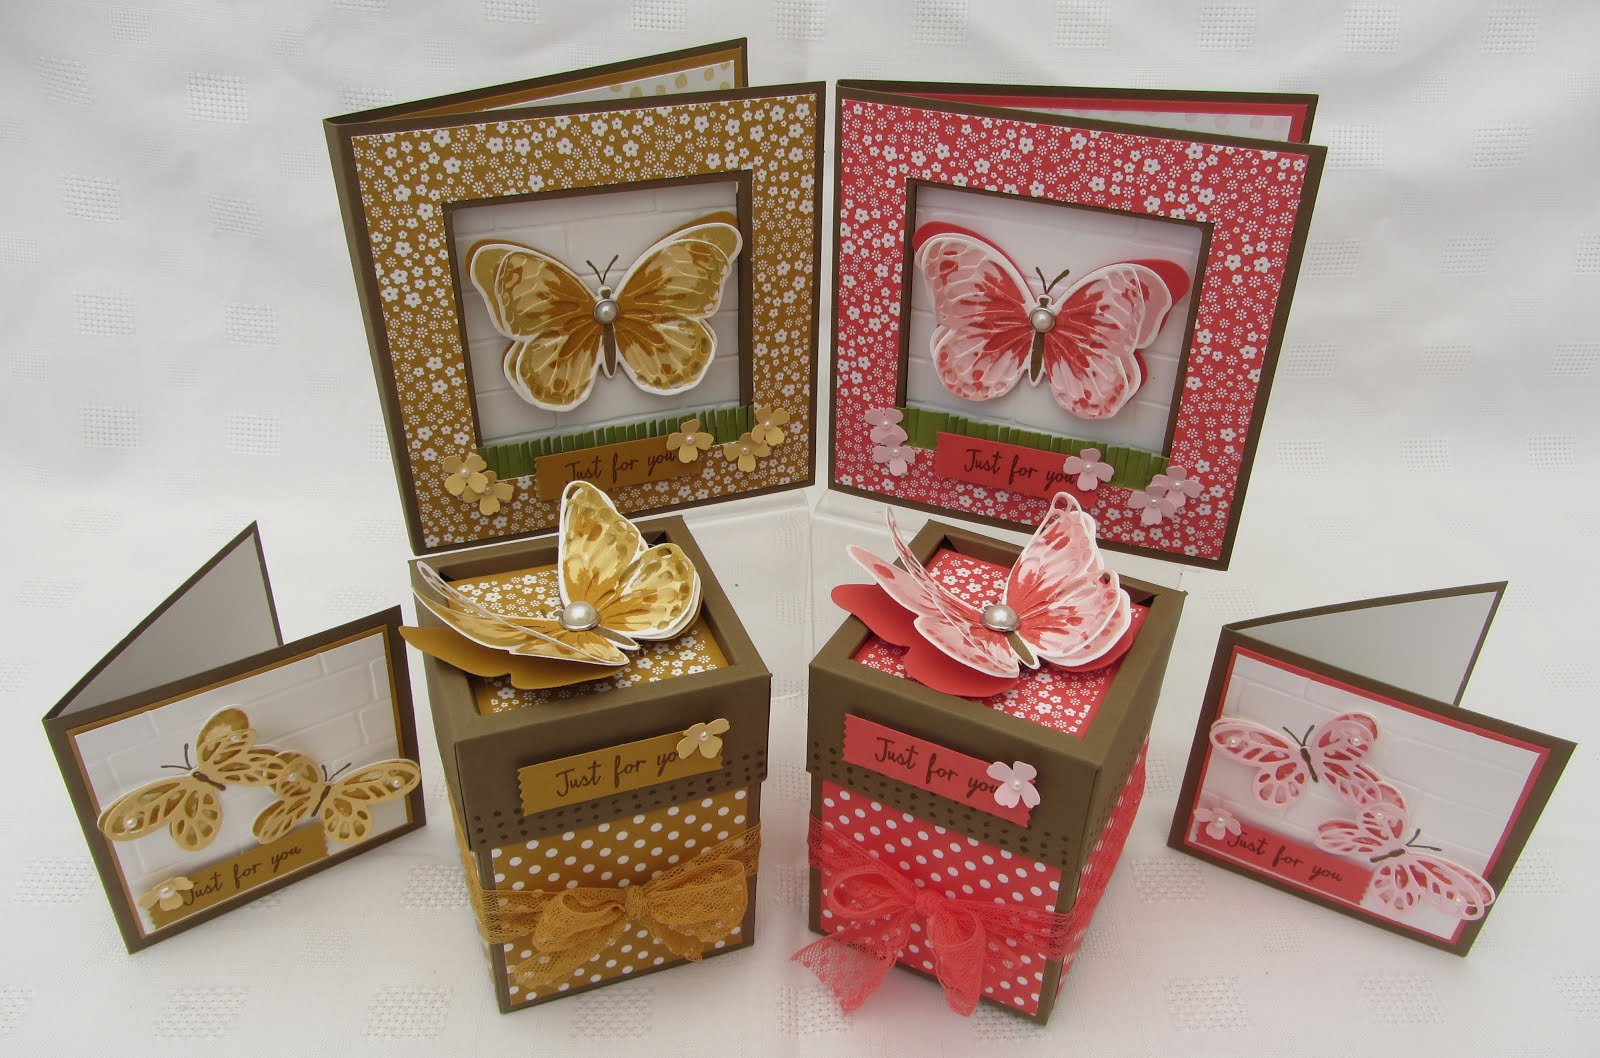
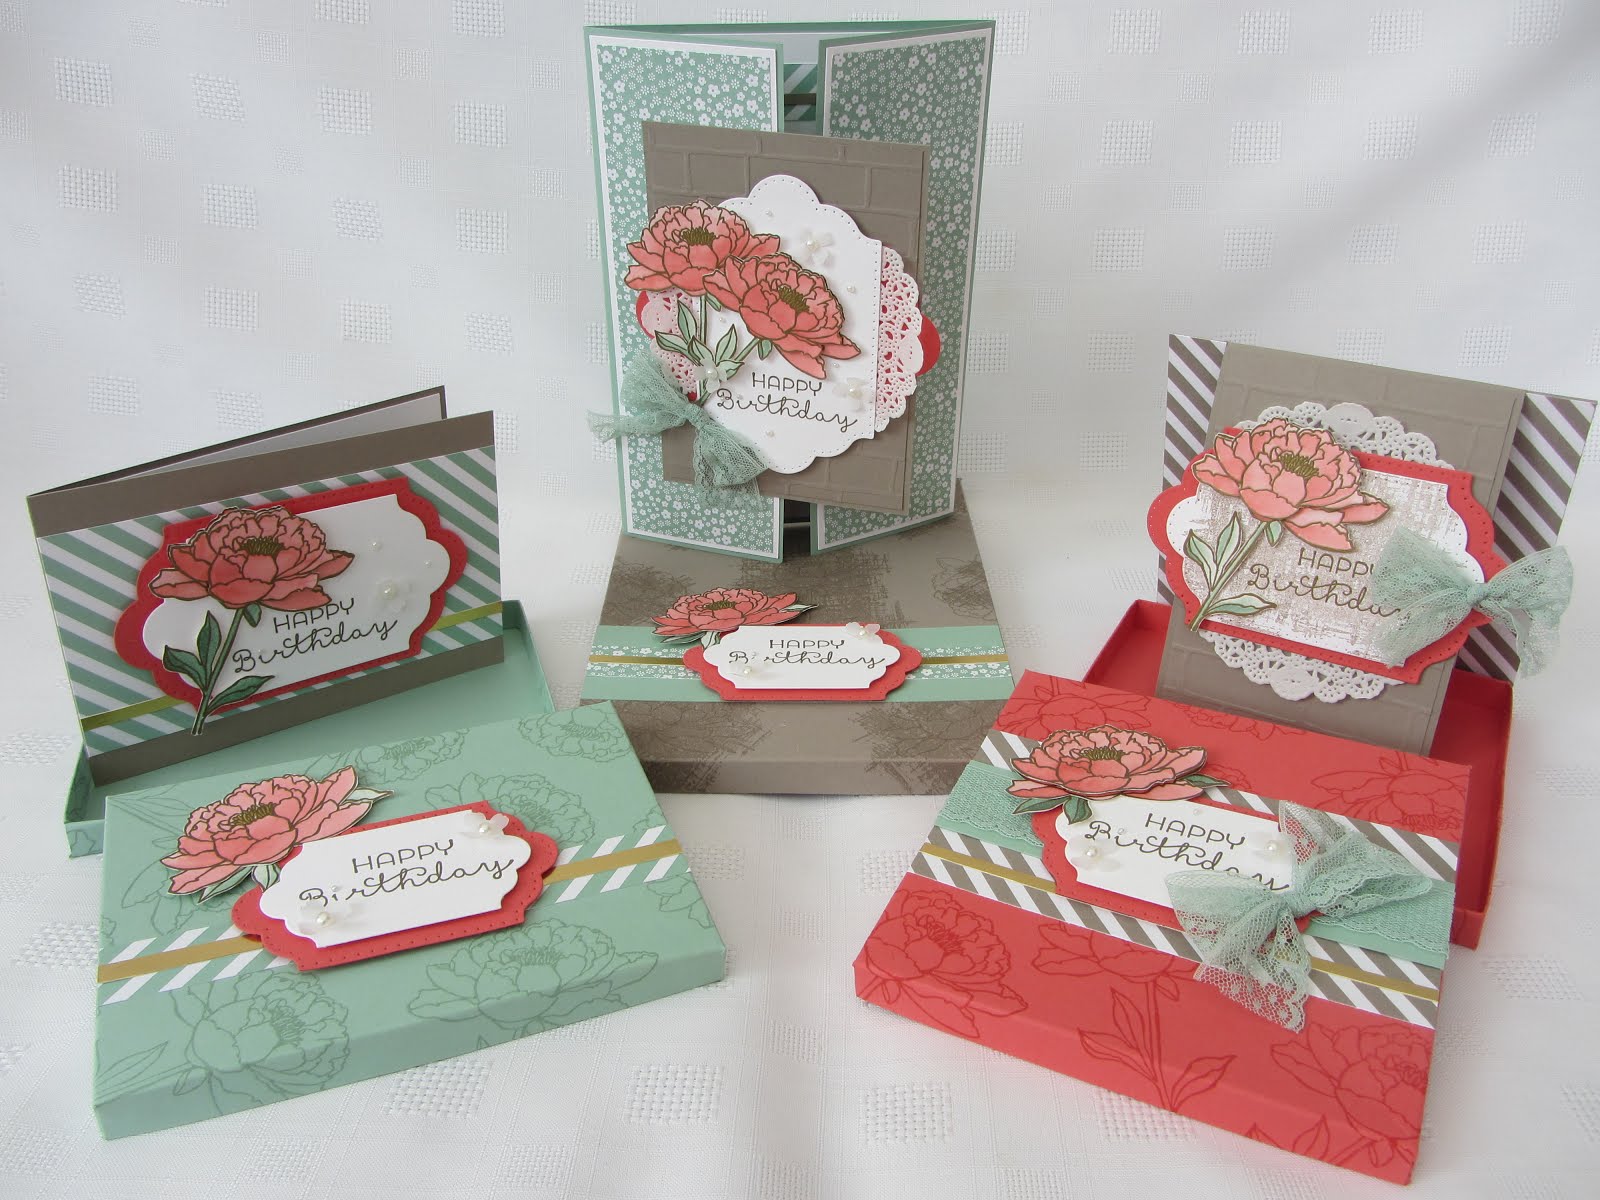
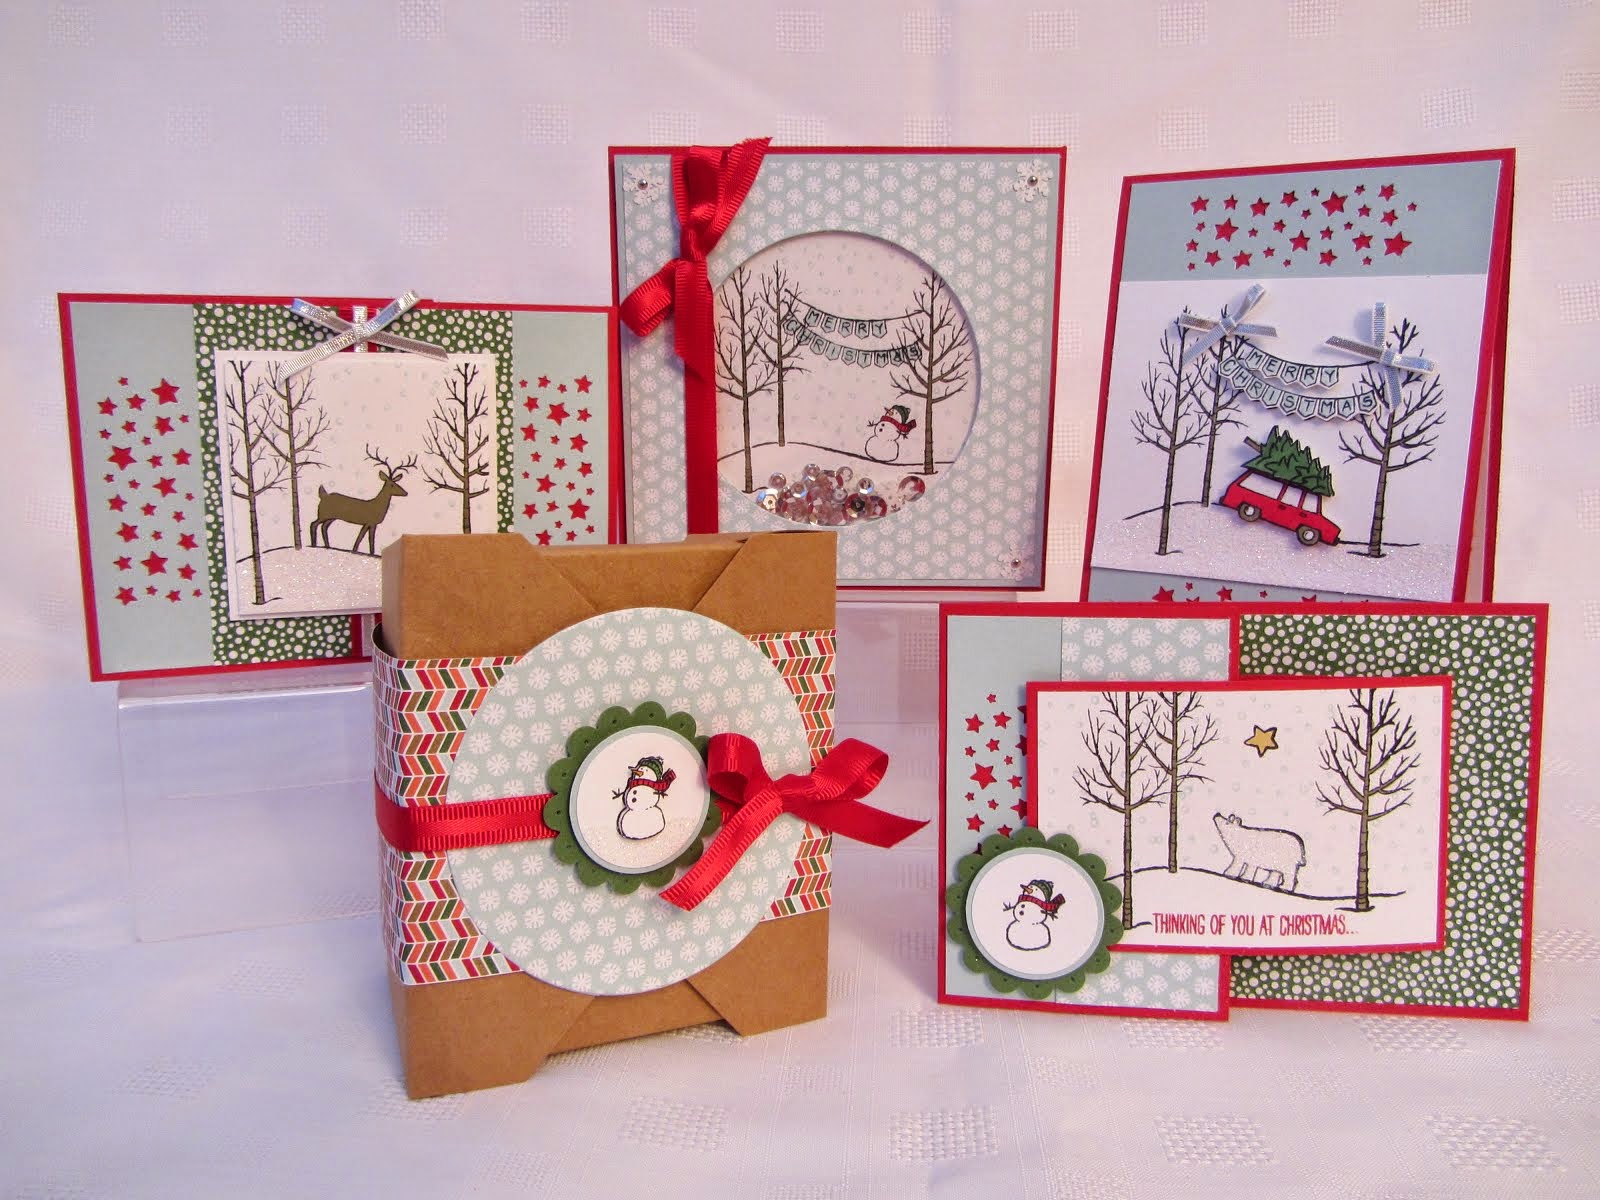
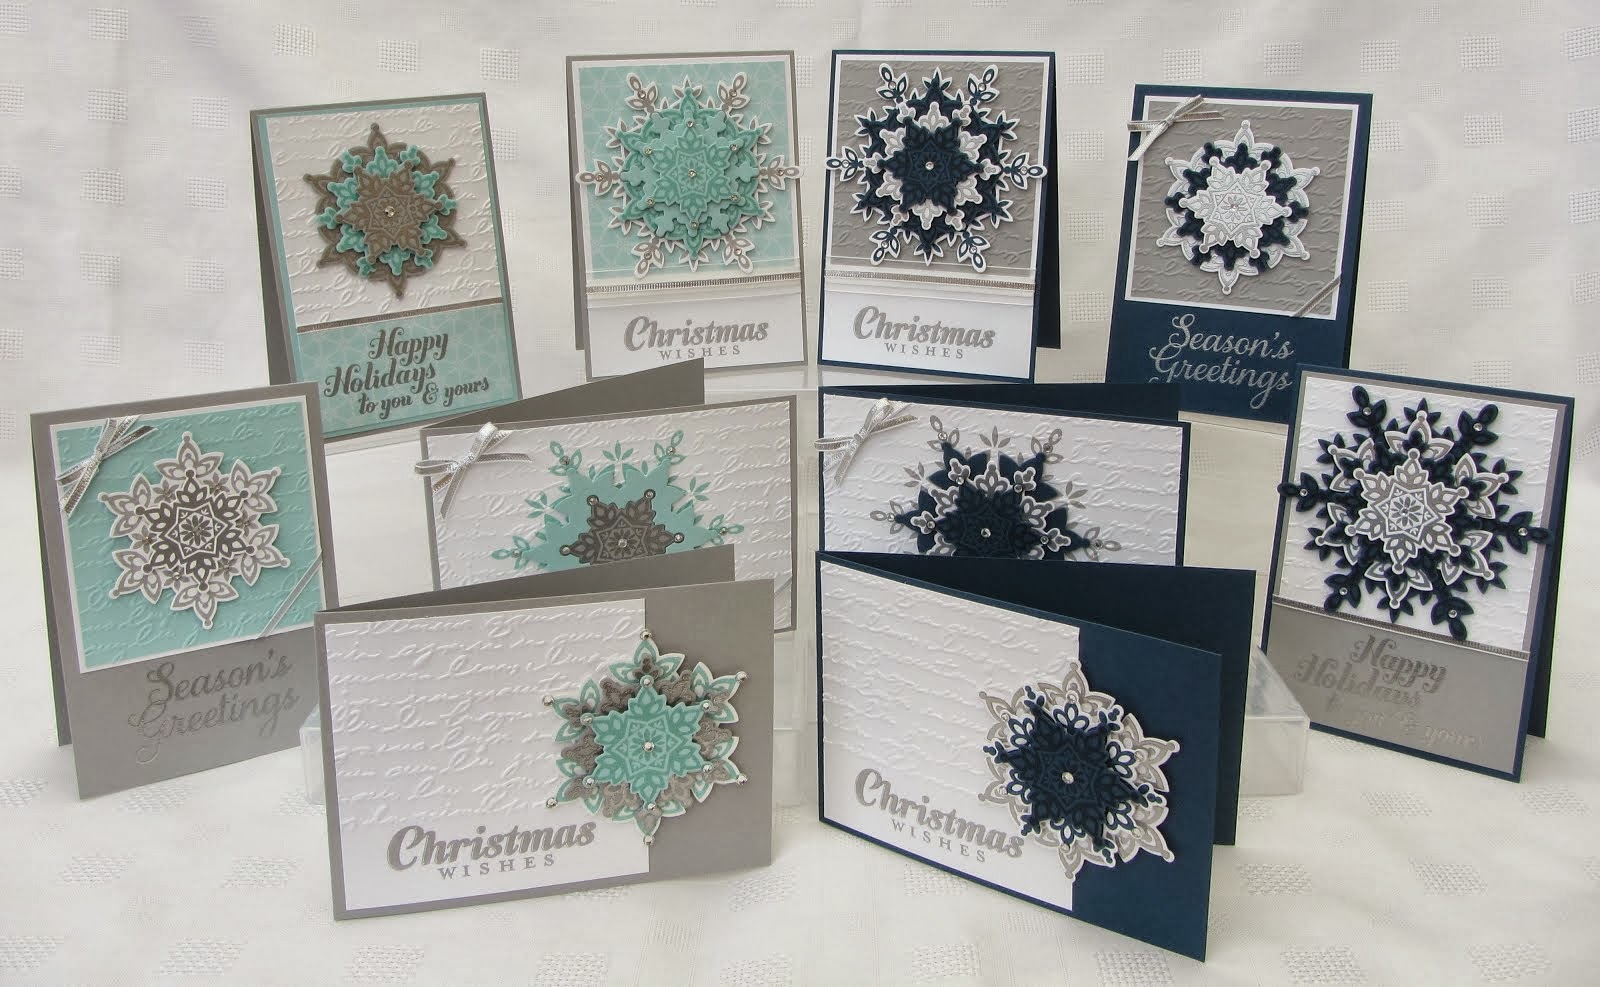
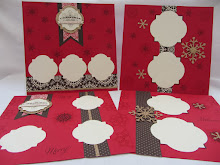
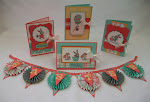
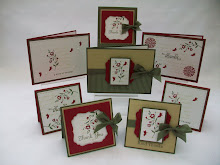
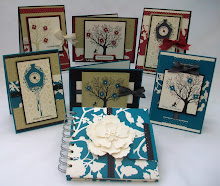
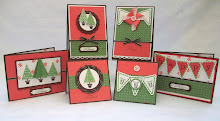
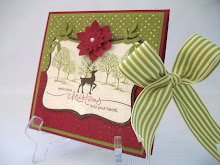
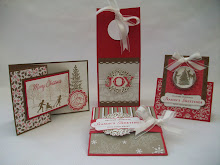
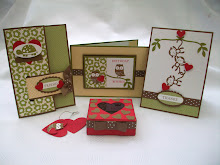
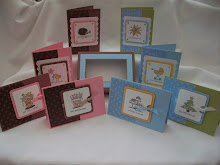
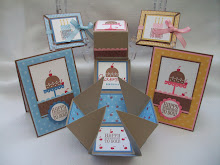
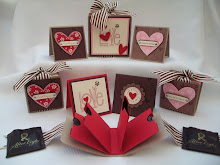
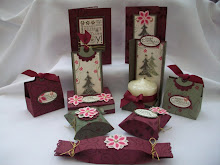
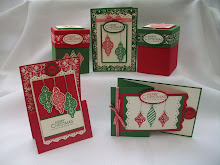
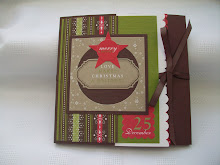
The Christmas Tree in this set is just asking to be used in so many ways but time is against me at the moment, so for these cards I just stamped and cut it out. The cardstock used is Always Artichoke, Bravo Burgundy, whisper white. I stamped it in Versamark on Always Artichoke cardstock and added while embossing powder, heated it up and cut it out. I embossed some more Always Artichoke with the script embossing folder and added some white. I used the 1" circle punch half way in to punch out the half a circle so the ribbon on the Bravo Burgundy could sit flat. I stamped the sentiment from the wonderful words stamp set down the side which I have cut away and added some white and bravo burgundy behind it.
I stamped the words in Bravo Burgundy and the snowflakes were stamped in versamark for a watermark effect.
I coloured the tree in with the pastels from Stampin Up this time. Cor! that was relaxing!. (Note: to self Get out Pastels more often).
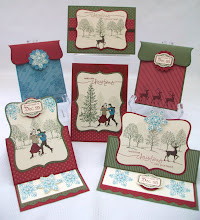
I stamped another tree and added the dazzling diamonds glitter to the ground and scribbled all over the 3 trees. Love the Diamonds......
I popped up the tree in the middle. Wish I had used more Pastels on the middle tree, will have to try that next time.

For now though, I am off on hols Be back soon,

Thanks for looking,
Jenny:-)xx

Wednesday 20 August 2008

Midweek Mini - Be Happy File Box

This is my project for this weeks - Midweek Mini......
While looking at the beautiful boxes for last weeks 3 x 3 box tutorial over at splitcoaststampers, one lady made a mini file box. I fell in love with it and thought I would have a go for my Midweek Mini. Check out Beckys lovely box here.

The cardstock I used is Ruby Red, Mellow Moss, Cameo Coral and whisper white. Same for the inkpads.
This is the mini file box with the 3 cards and embossed envelopes inside. You could probably get another card and envelope in it.
The base card is 14.8cm x 7.4cm, you can get 4 of these size cards from one sheet of A4 and you will be left with a strip for punching. I stamped the flower from Be Happy stamp set and cut it out. I then added a large clear SU button with some Mellow Moss ribbon threaded through the middle. I added a glue dot to the back to attach it to the flower. I embossed a strip 7.4cm x 3cm of Ruby Red with Floral Fantasy embossing folder and edge this with some Cameo Coral. I stamped the Enjoy in Mellow Moss and cut it out then added this to the layer. The flower was added to the card with a 3D Dimensional.
The base card is Ruby Red and the same folder was used on all the cards and box. I stamped the smile image in Cameo Coral and punched it out using the 1 1/4 circle punch, then added some cameo coral using the 1 3/8 circle punch and lastly I added a scallop circle in Ruby Red. I used my white gel pen to add some dots in the scallops and some Mellow Moss ribbon to finish.
I love this card best out of all 3. Its the same size but I trimmed of 1.5cm from the front edge and used my corner rounder punch to do the scallop edge. I added some Ruby Red embossed cardstock before the stamped tag from the Be Happy stamp set. The flowers were punched out using the Three for You Punch Box punch and the brads are SU silver ones.
On the front of the box the flower at the front was punched out of embossed card, which I will definately do again, it looks so cute!
I made these tiny envelopes to go with the mini cards, from whisper white cardstock. They are really luxurious, especially with the embossed flaps.
Check back tomorrow and I will show you how I made the envelopes and mini file box.

Thanks for looking,
Jenny:-)xx

Tuesday 19 August 2008

Two Card Tuesday......

I said for Tuesdays I am going to make a couple of cards the exactly the same but just change the colour combinations for them. These are what I quickley came up with today......

The stamp set is A Touch of Nature and Occasional Greetings for the sentiment. The base cards are half a sheet of A4 cardstock cut length ways. These are really simple cards that should be fine for a mans birthday.
This colour combinations is Basic Gray, Bravo Burgundy and whisper white.
This colour combinations is Close to cocoa, Certainly Celery and whisper white.

The ribbon is the wide 5/8 grosgrain and the jumbo eyelets were set using the crop a dile...

Thanks for looking,
Jenny:-)xx

Monday 18 August 2008

SU Tag Punches.........

This Monday I wanted to share with you a few ideas I have been using the 2 Stampin Up Tag Punches for.......

This first card and tag is using with the Terrific Tag stamp set, in Ballet Blue, Real Red and whisper white cardstock. The ink is ballet blue and some dazzling diamonds glitter to finish. This idea is great for using up small bits of ribbon that would normally end up in the bin, SAVE them and put them behind punches. I just glued these ribbons, but also using staples to hold it in place also looks nice.

The tiny tag for a present is made by folding a piece of cardstock and punching the tag slightly to one side of the folded line. You can then write a message on the inside like a tiny card!
The basecard in Ballet Blue is 10.5cm x 21cm folded in half to make a square card. I used the snow flurries stamp set to decorate a piece of whisper white 10cm x 2.5, stamping them in Pretty in Pink and Ballet Blue. This time I added the eyelet to the tag punches to thread the taffeta Pretty in Pink ribbon through. I like Pink Christmas cards.
I used a tag with a Jumbo eyelet on this Pizza box. The large punch gives just enough edge of cardstock when its mounted to the smaller tag.
For this card, I did this for one of my classes, A Suspension card using the Large Tag punch and then the small tag punch. You can see step by step photos for making suspension cards on Splitcoast stampers site, Beate has done a great tutorial using the circle punches, but it works just as well with the tag punches.

Also the tag punches can be using to make a Tag Star, see previous posts around christmas time last year for these.

These are just a few ideas, if you use the tag punches for another idea, PLEASE leave a comment to share with everyone,

Thanks for looking,
Jenny:-)xx

Sunday 17 August 2008

Sundays Sharing Stampers with You.......


The stamper I wanted to share with you today, is Maria......

She made this lovely bag using the Lovely as a tree stamp set. Maria is super talented. I know she would love you to pop over to her blog and leave her a comment......

Hope you are having a lovely weekend.

Thanks for looking,
Jenny:-)xx

Saturday 16 August 2008

Saturday Sketches - Julies Mojo Sketches

There are tons of Sketch layouts for your cards and scrapbook pages, they are so very helpful, if you are having not idea of what you want to make.

Julie has a regular sketch layout on Mondays - her Mojo Monday Sketches. I decided to try out this one. I couldn't keep to the exact layer but nearly. I found the layers were far to thick for my liking when I layed the strip onto of the big circles so I put it behind.

The stamp sets used is Garden Silhouettes and basic phrases. The cardstock is More Mustard, So Saffron, Very Vanilla. I added some very vanilla wide grosgrain ribbon and this is held in place by a couple of rhinestones.

Pop over to Julies Blog for more card ideas using this sketch layout, they are all fantastic.

Thanks for looking,
jenny:-)xx

Friday 15 August 2008

Year After Year - Forgotten Stamps.....

Would you believe it? I got this stamp set in my Starter kit last November!!!! It was still unmounted and pushed to the back of the pile, so I only had time to cut and mount one, so I choose the cute little ellie phant.....Hee!

I needed a couple of new baby cards to get posted off, so these are what I came up with.
This one I stamped once on the whisper white oval and again on Certainly Celery designer paper. I used the curvy verses (which was another one I had to mount quickley as I haven't had to make many baby cards!!) for the sentiment. I added a couple of flowers from the pretties kit before putting it all together.
For this one I coloured in using my SU Markers in Bashful Blue and Close to Cocoa. I do like the ovals but they are a bit hard to line up for some reason, may be its too EARLY! I used a slim cuttlebugg embossing folder down the edge and cut it away, it looks lovely on the inside as the edge of the folder leaves a straight line.

I added a couple of black eyelets for the wheels, another item I forget to use!

Thanks for looking,
Jenny:-)

PS Dig out some of your Forgotten Stamps!

Thursday 14 August 2008

Tutorial Thursday - Hung up on Holidays

These are a few cards I made using the Hung up on Holidays stampset. I kept to Chocolate Chip, Real Red and whisper white cardstock and inkpads.
Whisper white looks so crisp against Real Red.
These cards are layered but not too heavy or popped up so they are super easy and great for postage costs.
The Tutorial below shows How to Line up the Baubles perfectly using the Stamp a ma jig.......
Stamp the ribbon 3 times, however you wish. I stamped 2 the same length and the middle one shorter.
Place you clear image sheet or a piece of vellum cardstock up against the Stamp a ma jig handle and ink up your stamp and stamp straight on to the sheet.
Line up the bauble on the clear sheet over the end of the stamped ribbon ends.
Put the Stamp a ma jig black handle back around the edge of the clear image sheet, carefully not moving either the stamped ribbon cardstock or the clear sheet.
Take the image sheet away, Don't move the black handle.
Now reink your stamp and place it using the Stamp a ma jig handle.
You can see it has lined the bauble up perfectly, so it looks like it is connected to the ribbon.
Stamp the other 2 baubles in Real Red.
Stamp your sentiment, this is from the occasional Greetings stamp set.
I added the image to some chocolate chip, then straight on to a Square Real Red card, made using a 20cm x 10cm piece of Real Red cardstock, folded in half.

A very simple card. You could make tons of these in an evening while watching TV. It is nice and flat for cheaper postage. You could step it up a bit if its too plain, by adding Dazzling Diamonds glitter to the baubles, or stamping them again and popping them up, or just add some lovely ribbon. A nice white insert with a stamped image on the inside and sentiment would complete the very simple card.

Hope you enjoyed this Tutorial.

Jenny:-)xx

Wednesday 13 August 2008

A Few Changes......


Starting from Tomorrow, I will be trying out a few changes on my Blog.....

I need to make the most of my Crafting time, so I'm going to experiment by keeping to the following ideas on certain days. I have seen a few other Bloggers do this and hopefully it will make me a bit more organised with what craft projects I have to show you.

I'm going to try it for a month, So Please leave me a comment if you like my posts sorted like this.....


MONDAY:- Making the Most of your SU Punches

I hope to show you lots of tips and ideas of making the most of all your Stampin UP Punches, either ideas I use them for or other crafters ideas which I have come across.

TUESDAY:- Two Card Tuesday

I will make two cards the same layouts and stamp sets, showing you what they look like in two different colourways. Sometimes just by changing your colour choices the stampsets look completely different.

WEDNESDAY:- Midweek Mini

On Wednesdays I will be making Mini Cards, these are so cute. You can change them so quickley into Gift Tags.

THURSDAY:- Tutorial Thursday

The Tutorials will show you step by step How to do a Project or Technique. Starting tomorrow.

FRIDAY:- Forgotten Stamps

I will pick a stamp set I haven't used in a long time and show you what I make.

SATURDAY:- Sketch Layouts

There are tons of Card Layouts on Splitcoast stampers, Beates, Julies and lots more.... I will pick one and make a card or something using the sketches.

SUNDAY:- Sharing Stampers

While Blogging I always come across so many other crafters that I admire their work, So on Sundays I am going to pick one and share them with you.


Back to the Mini Card above.

The stamp set is Hung up on Holidays. I have only just mounted this cute stamp set and for the life of me, Don't know why I side stepped this stamp set. The base card is 14.8cm x 7.4cm which is the size of all my mini cards I seem to make. You can get 4 from a piece of A4 cardstock, with a strip left over ideal for punching.

I punched out 2 scallop circles, one in Creamy Caramel and one in Chocolate Chip. I mounted them on top of each other and pricked in each of the scallops on the behind one. I then punched a Real Red 1 3/8 circle, layered this behind the Gingerbread man, isn't he Cute? I stamped him in Creamy Caramel and punched him out using the 1 1/4 circle punch. The ribbon is Kraft Taffeta. The sentiment is from the Occasional Greetings stamp set.


Well there you go,
I will be showing you a Tutorial on this Stamp set Tomorrow, So until then,
Thanks for looking and Listening to me,
Jenny:-)xx

Occasional Greetings...........

I got up extra early today, AS FROM TODAY I CAN ORDER PREORDER OUR NEXT CATALOGUES..........Whoo Hoo! I am so excited - If you want to go on my list for a cattie Email Me.

The stamp sets for this card are Occasional Greetings, Wonderful Words, In the Spotlight Hostess Level 2.... The cardstock is Certainly Celery, whisper white and certainly designer paper.

This card was super quick, the little girl is from the Summer By the Sea stamp set. I coloured her in using the ink in the lid of the inkpads. I scored a few lines and then cuttlebugged above and below them. I used the new thin strips that cuttlebug has brought out.

I must catch up with my ironing today before it attacks anyone!! The pile is huge again, I just don't know where it all comes from?

I still have places for the ribbon and paper share, Email me before Friday to take part.

Thanks for lookings,
Jenny:-)xx

Tuesday 12 August 2008

Lovely as a Tree Stamp Class Today......


These are the cards we will be making tonight at the Lovely as a Tree stamp class.

See all the other samples below, using the same stamp set.

I still have a few places in the ribbon and paper shares, It closes on Friday, so email me if you want to be included.

Jenny:-)xx

Lovely As A Tree Stamp Class Today......

These are the other Samples I have made using this Lovely as a Tree stamp set.


Hope you have a good day,
Jenny:-)xx

Monday 11 August 2008

A Touch of Nature..........

Hello Everyone! Long time No Crafting.......

Its been so hard balancing work this Summer but hopefully with working all over the weekend, I am finally seeing the end:-)

I am so excited at the moment waiting for the new catalogue being finally confirmed - 1ST OCTOBER. The retired list of products will be available for you to view on the 1ST SEPTEMBER, So you have a little while to get the retired products before they are no longer in the catalogue.

I managed to sneak in the craft room this morning at 7am, as I got back from the paper round early! The stamp sets used were A Touch of Nature, Enfrancais Background, Occassional Greetings. I could tell I haven't been crafting lately as this took me far longer to put together than it usually does!! The inkpads used were Not Quite Navy, Ruby Red & Old Olive. I used a couple of hodge podge bits for the ribbon, which is Always Artichoke. The embossing folder is Floral Fantasy.

This is one of our Sunflowers growing in the Garden, beautiful and the hover flies are doing a fantastic job eating the bugs.

Thanks for looking,
Jenny:-)xx
 
09 10